How to Print PDF Patterns at home
If you are completely new to PDF sewing patterns, here’s a guide that you need to know to get started with PDF sewing patterns. A PDF pattern is simply a digital version of the printed pattern you use to sew a garment. Pattern is just available in a different format.
Why use PDF Sewing Patterns?
Here are some great benefits of using digital sewing patterns:
-
PDF patterns can be downloaded instantly. This means you can access them from anywhere in the world without paying shipping. You buy it, download it, print it out and sew it up!
-
They are often cheaper than the commercial printed patterns.
-
You can print the pattern as many times as you want in different sizes. If you lost a pattern piece, or damaged a pattern by accident? Print it out again, easy! This is also useful for sewing kids clothing as you can reprint sizes as your child grows.
What is a Layered PDF pattern file?
If you find above mentioned things helpful, here's one added bonus- all of my PDF patterns are LAYERED!
Layered PDF pattern files include all of the sizes in the same file, but they are stacked on top of one another on separate layers. This allows you to select the size, or sizes, you need before printing, deselect sizes you don't need. For more details go to "Select sizes(s) to print".
DOWNLOAD
Download your pattern using a laptop or desktop. This is important as most mobile devices are not set up to download PDFs. You can try a free pattern here. Save the pattern where you can easily find it. Example, make a folder on your computer "PDF Sewing Patterns".
OPEN
Open the file in a PDF reader such as Adobe Reader. Most computers should have this installed already but if yours doesn’t you can download it for free at http://get.adobe.com/reader/.

SELECT SIZE(S) TO PRINT
DO NOT skip this step! Unless you want to get confused with all the sewing lines going in every direction and then end up throwing your pattern. I have a huge size selection, so printing all sizes on one page may not be a good idea, hence LAYERS!
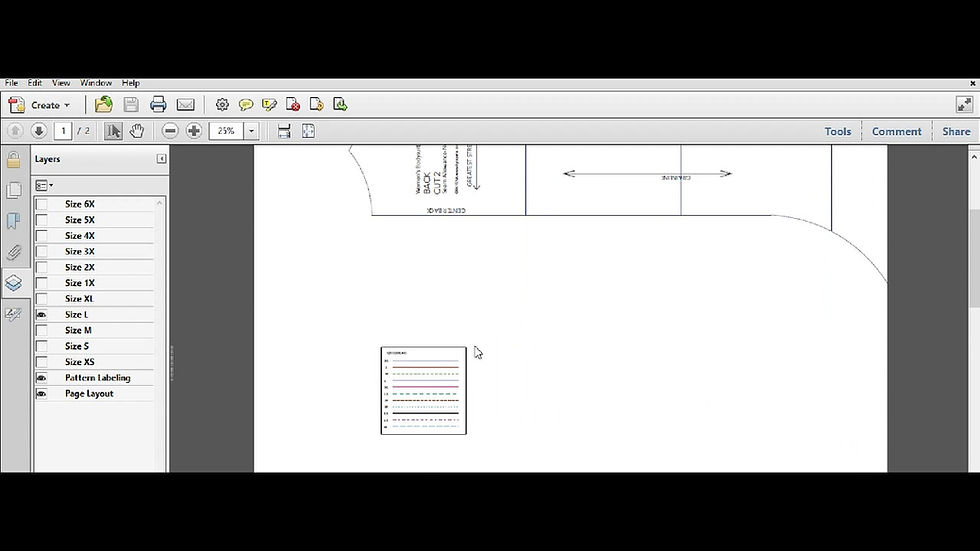
To select only specific size(s), click on the layer option on the sidebar. You can also open this window by clicking on View > Navigation Panels > Layers

Then expand out the layers by clicking on the layer group at the top of the panel.

Here, you will see a list of different sizes with little eyeballs underneath each of them. Deselect sizes you don’t want to print and keep eyeball visible for your size. DO NOT deselect layers “Pattern Labeling” and “Page Layout”. They have pattern markings and guideline to tape/arrange your pages once printed.
In the below example, Size M is selected and rest all sizes are hidden. Now you are all set to print!

PRINT YOUR PATTERN
Rayena PDF Patterns are available in 3 page sizes:
US Letter- 8.5 x 11 inches (215.9 x 279.4 mm)
A4- 8.27 × 11.69 inches (210 × 297 mm)
A0- 33.1 x 46.8 inches (841 x 1189 mm)
US Letter and A4 page sizes can be printed on your home printer.
A0 page size is copy shop format, which can be printed on a big plotter machine at any printing service locations.
Based on your home printer configuration, you can choose either Letter or A4 size pattern file to print your pattern at home.
In Adobe Reader, go to File-> Print.
Select the pages you would like to print. If you only want to print specific pattern pieces, use the page layout provided in the Style Guide document (available with the pattern download) to determine which pages to print. Pages shown in grey color are blank pages and do not contain any pattern. Select "All" in the Print Range if printing all the pages.
It is really important that you set your scaling to “actual size”. Some printers might word this as “none” or “100%” or “turn off scaling”. Even a small percentage of scaling can change the fit of your garment.
You can select "Print color as black" to print in black and white. This is optional.

CHECK SCALE
After you have printed the pages look for the test square.It is mostly on the first page.
Get out your ruler and check that it measures correctly. If it doesn’t then check your print settings and try again.
If you have a pattern with a large number of pages, print just the test square page first before printing the entire pattern.

PATTERN LAYOUT GRID
Your pattern will go together in a grid. Check your pattern instructions for the grid layout. Patterns shown below are nested, but with layered printing, only the selected patterns will print out.

TAPE
Match up the edges of the frames to put your pattern together. You can cut along the edges of the frames, or just fold along the edge. The patterns will also print with ½ inch pie-shaped marks in each page corner. Tape the pages matching the pie wedges to form a circle.
Align the edges of the frames sticking the pattern together in the nominated grid layout using a sticky tape. Repeat for rest of the grid to complete your pattern.

Fold the edge
Cut the edge

SEWING PDF PATTERNS
Rayena patterns do not include seam allowances. Please add hem and seam allowances before cutting out the pattern. And then you can start sewing!
Shop for patterns at RAYENA